.png)
Blockchain prototyping can be complex, especially for enterprise use cases, but Kaleido’s powerful platform, packed with many features, simplifies the process. Combined with Cursor’s AI code generation, or similar AI-coding assistants like Github Copilot, Kaleido’s AI-enabled platform allows you to transform ideas into functional blockchain applications faster than ever.
By describing your vision in plain English, you can quickly generate functional code, iterate instantly, and build compelling web demos that bring your concepts to life. Whether you’re tracking supply chain goods or managing stablecoins, I’ll share a few powerful tips I’ve learned to help you build a blockchain demo app on Kaleido’s platform with the help of AI tools.
Kaleido simplifies blockchain adoption for businesses with a powerful Blockchain-as-a-Service (BaaS) platform, supporting protocols like Ethereum, DAML/Canton and many others, and offers tools for digital asset management, smart contracts, and Web3 development. Paired with Cursor (or other AI-coding assistants), an AI coding assistant, you can prototype sophisticated apps without deep technical expertise.
This combination allows you to go from idea to demo in hours, not days or weeks, with AI-generated code and Kaleido’s rich catalog of services. Non-technical users can describe ideas in plain English, and Cursor translates them into functional code, while technical users can use this approach to start a new application development to quickly get the project off the ground.
Kaleido’s APIs, FireFly middleware, blockchain explorer, digital asset indexer, and modeling along with all the other services ensure your demos are robust and scalable, making integration seamless and impressing stakeholders with cutting-edge technology.
Before building your prototype, ensure you have the following:

Building a blockchain-based web app on Kaleido requires an existing Web 3.0 stack to support blockchain interactions, transaction management, and digital asset handling. This stack, configured in your platform, enables use cases ranging from stablecoins, tokenized real world assets (RWAs), central bank digital currencies (CBDCs), and cross-organization workflows to supply chain tracking or collectibles.
To begin prototyping, configure the following Kaleido resources:
For step-by-step instructions on configuring these resources, follow the Platform Setup guide in your Kaleido account’s documentation (Using the Platform > Platform Setup).
For apps involving tokens, the Getting Started guide (Using the Platform > Getting Started) provides a sample workflow for deploying and indexing assets, adaptable to other use cases.
With these components in place, you’re ready to build your demo app.
Whether you’re prototyping a stablecoin platform or a supply chain tracker, the building process is the same: craft a plan, generate code with Cursor, and integrate Kaleido’s APIs. I’ll use a stablecoin management app as an example to illustrate each step.
Before writing a single line of code, it is important to lay a strong foundation by defining your app’s purpose and creating a detailed plan. This step is critical to avoid inefficiencies, such as Cursor generating code that misaligns with your goals or complicates future features. Using Cursor’s chat panel, you can collaboratively craft a comprehensive plan that incorporates Kaleido’s APIs for seamless blockchain integration.
1. Set Up Your Workspace
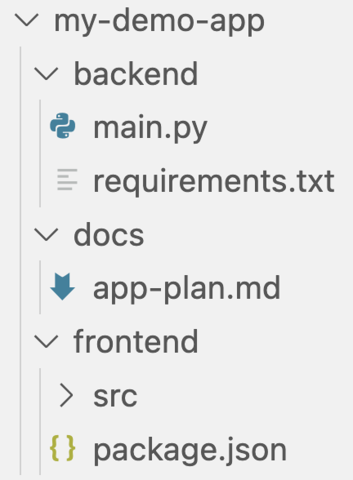
Start by opening Cursor and creating a new folder for your project (e.g., my-demo-app). Use the integrated terminal (View → Terminal or Ctrl/Cmd + `) to initialize your workspace.
2. Define Your Use Case
Before you begin, have a clear idea of your app’s purpose, including its core functionality, target users, and blockchain-specific features. For example:
Use Cursor’s chat panel (Ctrl/Cmd + K) to refine your idea. Upload Kaleido’s openapi.yaml file via the “Attach File” option to ensure Cursor understands the available API endpoints. Then, provide a precise prompt to generate a detailed plan. Here’s an example for the stablecoin app:
“Write a detailed plan for a stablecoin demo app using Kaleido’s platform and a simple ERC-20 token with mint, burn, and pause features critical for stablecoin issuers. The app should have a modern, simple UI/UX and connect to Kaleido’s APIs for backend functionality. Attached is Kaleido’s OpenAPI specification file (openapi.yaml). Include:
3. Iterate and Refine the Plan
Cursor will respond with a detailed plan, including a recommended tech stack, project structure, and step-by-step implementation guide. Review the plan and refine it by asking follow-up questions, such as:
“How should I structure the backend to handle authentication securely?”
“Is FastAPI the best choice, or should I consider Node.js for this use case?”
“Can you add real-time transaction updates to the dashboard?”
Iterate until the plan is comprehensive, covering all features, API integrations, and technical details you wish to include in your prototype. Ensure the plan leverages Kaleido’s APIs as outlined in openapi.yaml.
4. Save the Plan
Once satisfied, instruct Cursor to save the plan as a markdown file for reference:
“Save this detailed plan as a markdown file named app-plan.md in a new docs directory.”
This file will serve as your blueprint, ensuring Cursor generates code aligned with your vision.
Why This Matters: Starting with a detailed plan prevents Cursor from generating misaligned code, saving time and reducing rework. By incorporating Kaleido’s API spec early, you ensure the plan accounts for blockchain-specific functionality, such as token minting or event tracking.
With your plan in place, use Cursor to generate the backend and frontend code, leveraging the detailed blueprint and Kaleido’s APIs.
1. Generate Project Structure
In Cursor’s chat panel (Ctrl/Cmd + K), provide a prompt to create the project structure. Remember to include your app plan file:
“Create a blockchain demo app with a Python FastAPI backend and React frontend, following the project structure outlined in app-plan.md. Set up folders for backend, frontend, and documentation.”
Cursor will generate a structure like:
2. Generate the Backend
Prompt Cursor to create the backend, referencing the plan and Kaleido’s API spec.
For the stablecoin app, I’ll prompt Cursor:
"Generate a Python FastAPI backend for a stablecoin app based on app-plan.md, using Kaleido’s APIs (attached openapi.yaml). Include endpoints for:
Implement authentication and error handling.”
Cursor will generate a backend file using Kaleido’s API endpoints (e.g. /invoke/mint and /query/balanceOf).
3. Generate the Frontend
Prompt Cursor to create a frontend that connects to your backend.
For the stablecoin app, I’ll prompt Cursor:
“Create a React frontend with Tailwind CSS for a stablecoin app based on app-plan.md. Include pages for:
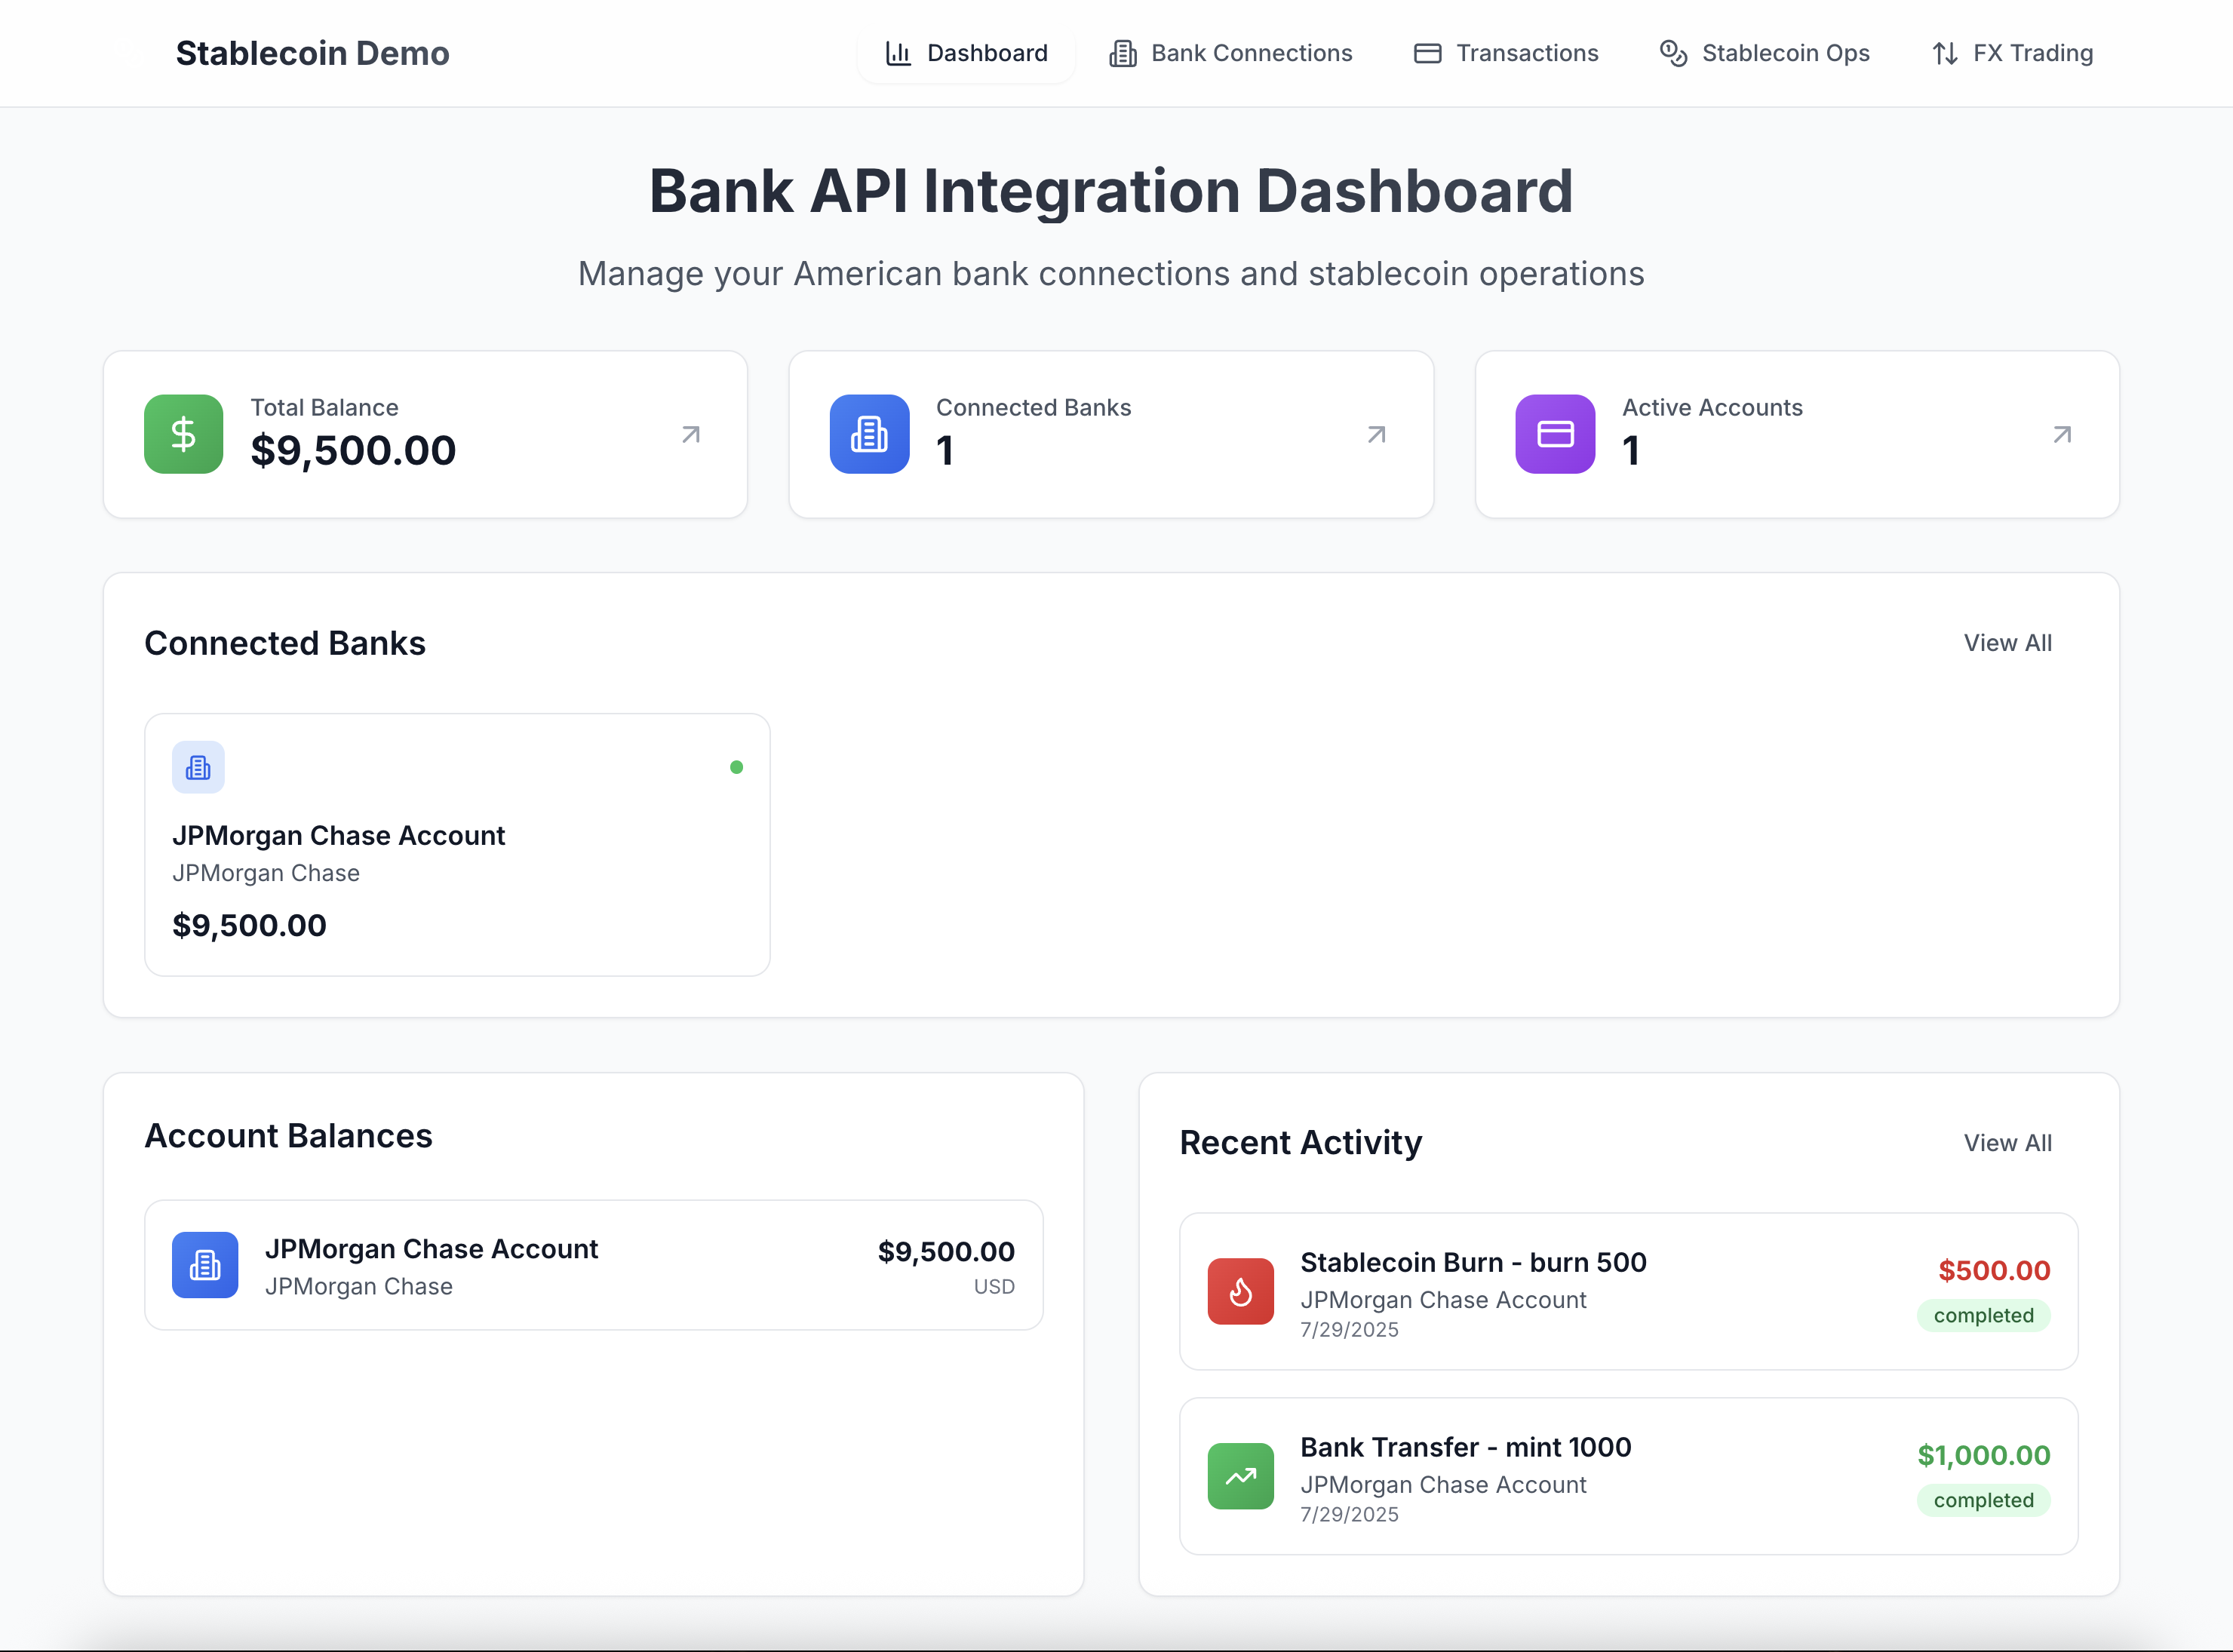
Dashboard: Show total balance, banks, recent activityBank Connections: Manage mock banksTransactions: Display history, include add-funds modalStablecoin Operations: Track minted/burned tokens, include burn buttonFetch data from my FastAPI endpoints.”
Cursor will generate components in frontend/src/pages, styled with Tailwind CSS for a modern, responsive UI.
With code generated, we can now run and test our prototype app to ensure it works as expected:
1. Run the App:
💡Tip: If you are using a different tech stack and unsure how to run your app, just ask Cursor!
2. Verify Functionality:
“Write unit tests for the /transactions/add-funds endpoint in backend/main.py, and iterate until all tests pass.”
💡Tip: To use prompts “iterate until all tests pass,” Auto-Run mode must be enabled in

3. Troubleshoot Issues:
Once your initial demo is functional, refine it by adding specific features, enhancing the user experience, or optimizing code.
1. Add New Features
Use targeted Cursor prompts to add specific functionality. For the stablecoin app, I’ll add a burn feature:
“Add a FastAPI endpoint /stablecoin/burn to call Kaleido’s /invoke/burn API, and update StablecoinOps.tsx with a Burn button opening a modal for amount input."
Cursor generated the endpoint and updated the frontend with a modal for users to input burn amounts and select bank accounts to credit fiat.
2. Enhance UI/UX:
Improve the interface as needed. For the stablecoin app, we can prompt Cursor:
"Enhance the homepage UI (Dashboard.tsx) using Tailwind CSS. Implement a responsive grid structure for three key statistics cards (Total Balance, Connected Banks, Active Accounts). Below this, display a list of connected bank accounts and recent transactions, ensuring both sections adapt well to different screen sizes and include clear empty states."
Here is a prompt I’ve had great success with:
"Perform a complete UI/UX overhaul on my web app to ensure a polished, professional look, incorporating Material-UI components."
3. Optimize Code:
Use Cursor to review and improve your codebase:
"Check my codebase for compliance with Kaleido’s API authentication requirements and recommend secure practices."
Also try:
"Please read over my entire codebase, identify any errors and code that can be improved"
After following this guide, we have successfully built a functional stablecoin management prototype application in no time with fully working token minting, burning, balance querying, and transaction tracking, seamlessly integrated with secure bank connections and real-time event indexing, thanks to Kaleido's AI-enabled platform.
Whether you’re an existing Kaleido customer or a new user looking to build a blockchain demo, Kaleido and Cursor make prototyping fast, accessible, and powerful. Your idea is just a prompt away.
To start prototyping, contact us about our Enterprise Product Suite at kaleido.io/pricing.