Have you ever wondered how digital artists are turning their creations into valuable, one-of-a-kind assets? The world of NFTs (non-fungible tokens) offers a revolutionary way to showcase and monetize your digital art, music, and more.
Whether you're an artist looking to protect your work, a collector searching for unique pieces, or simply curious about this booming trend, minting an NFT can open up new opportunities.
In this guide, we'll walk you through the simple steps to create your own NFT and join the vibrant community of digital creators. Let's dive in and transform your digital content into a unique masterpiece on the blockchain!
Before delving into the creation process of an NFT, it's crucial to grasp what an NFT fundamentally represents. Standing for Non-Fungible Tokens, NFTs are distinct digital assets, ensuring that each token is inherently unique. Imagine each NFT as having a digital fingerprint. Even if two NFTs might visually appear identical, their unique digital codes differentiate them.
This uniqueness is what significantly empowers digital creators. Previously, digital artworks could be replicated indefinitely without a method to distinguish the original from its copies. NFTs change that dynamic, introducing a way to verify authenticity and ownership of digital files, marking a revolutionary shift in how we perceive and value digital creations.
Minting an NFT refers to the process of creating a unique digital asset on a blockchain. When you mint an NFT, you are essentially publishing a one-of-a-kind digital token that represents ownership or proof of authenticity of a digital item such as artwork, music, video, or any other digital file. This token is recorded on a blockchain, ensuring its uniqueness and enabling it to be bought, sold, or traded.
By minting an NFT, you transform your digital content into a certified original that can be tracked, owned, and traded securely on the blockchain.
There are many reasons to create an NFT on Kaleido. For one, minting and transferring NFTs on our platform requires no gas, meaning there is no transaction cost to you! Kaleido also makes it very simple to deploy your own NFT smart contract.
On platforms such as Opensea, Rarible, or others, the process is more cumbersome and NFTs are hosted on public chains. Here, you will need to connect and fund a wallet with an appropriate cryptocurrency in order to do any sort of transaction because those chains require gas to pay for the transaction. Opensea takes a service fee of 2.5% in addition to gas fees for any sales of NFTs. On Kaleido you are able to make NFTs on your own chain and dictate custom properties.
If you haven’t already, sign up for a Kaleido account here. Create an account and password and you will be all set. NFTs can be created with any plan on Kaleido, starter tier (free) included!
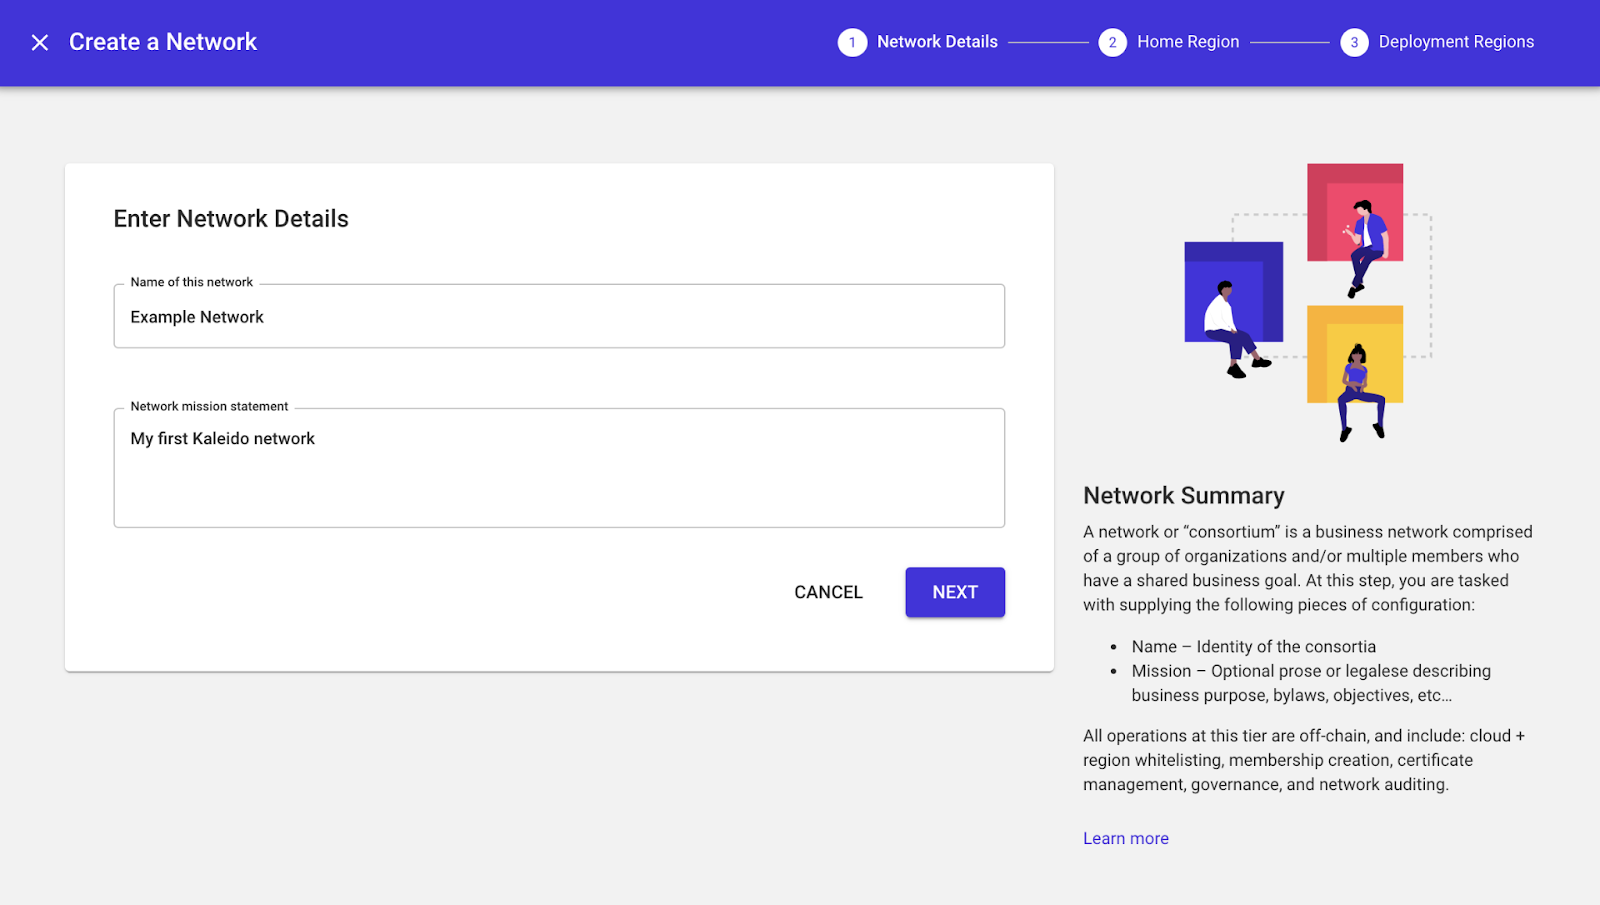
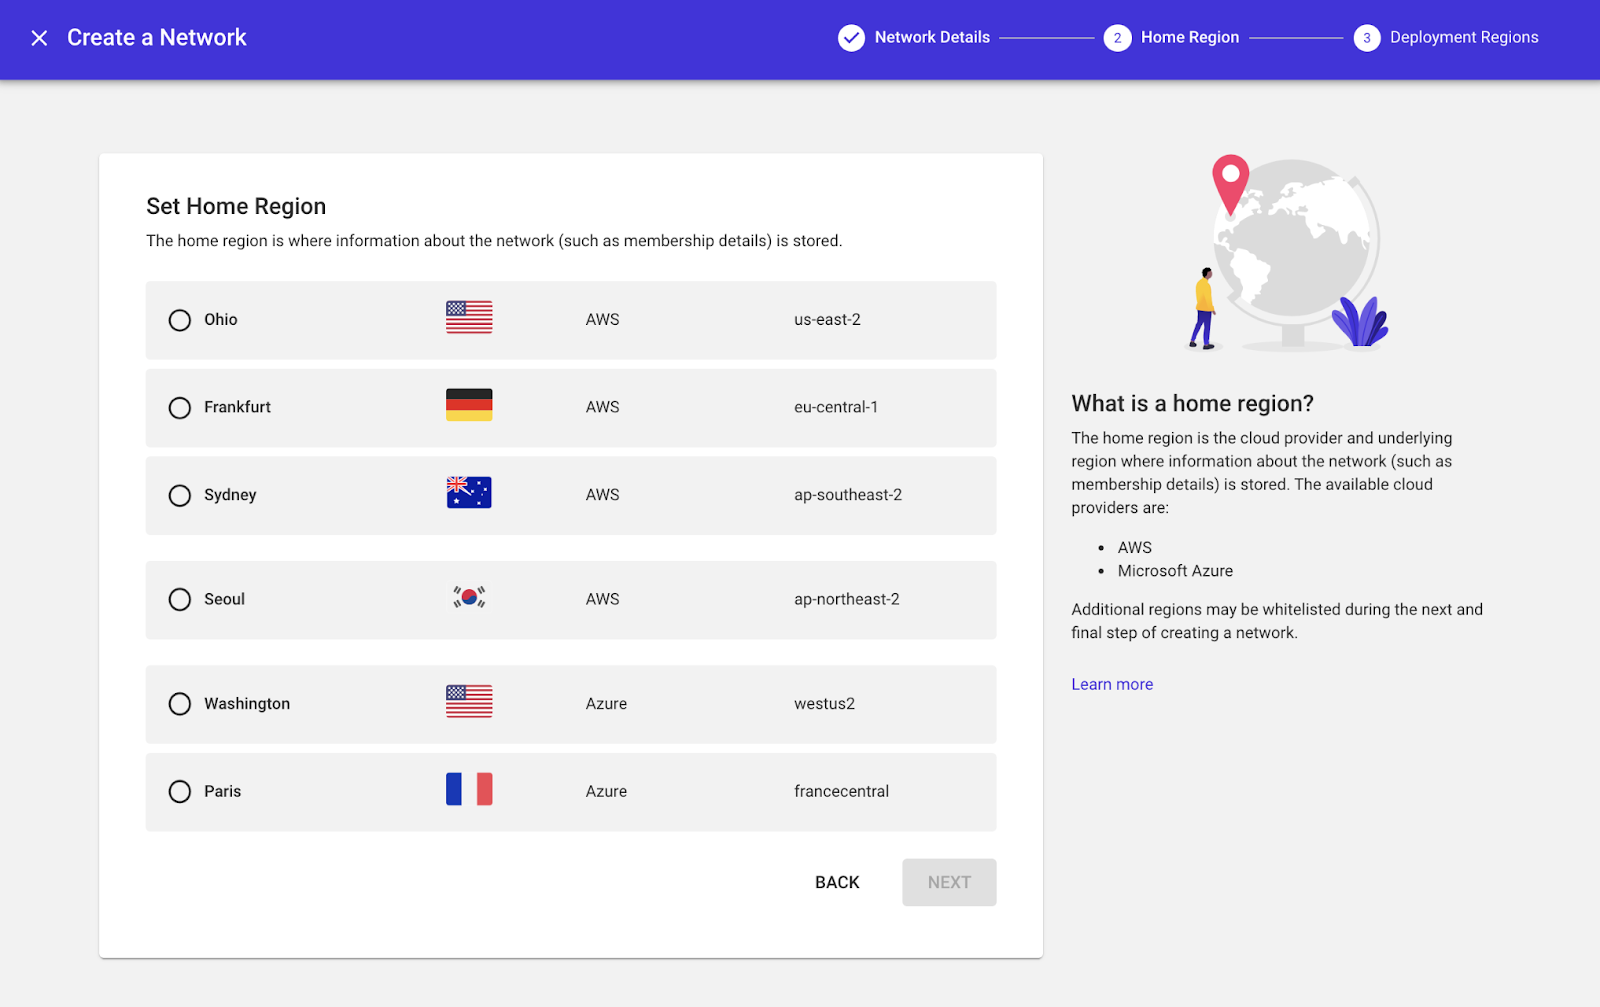
To get started, create a blockchain network. You will need to name your network and select deployment region(s). This is where your resources will be hosted and there are various options for AWS and Microsoft Azure.
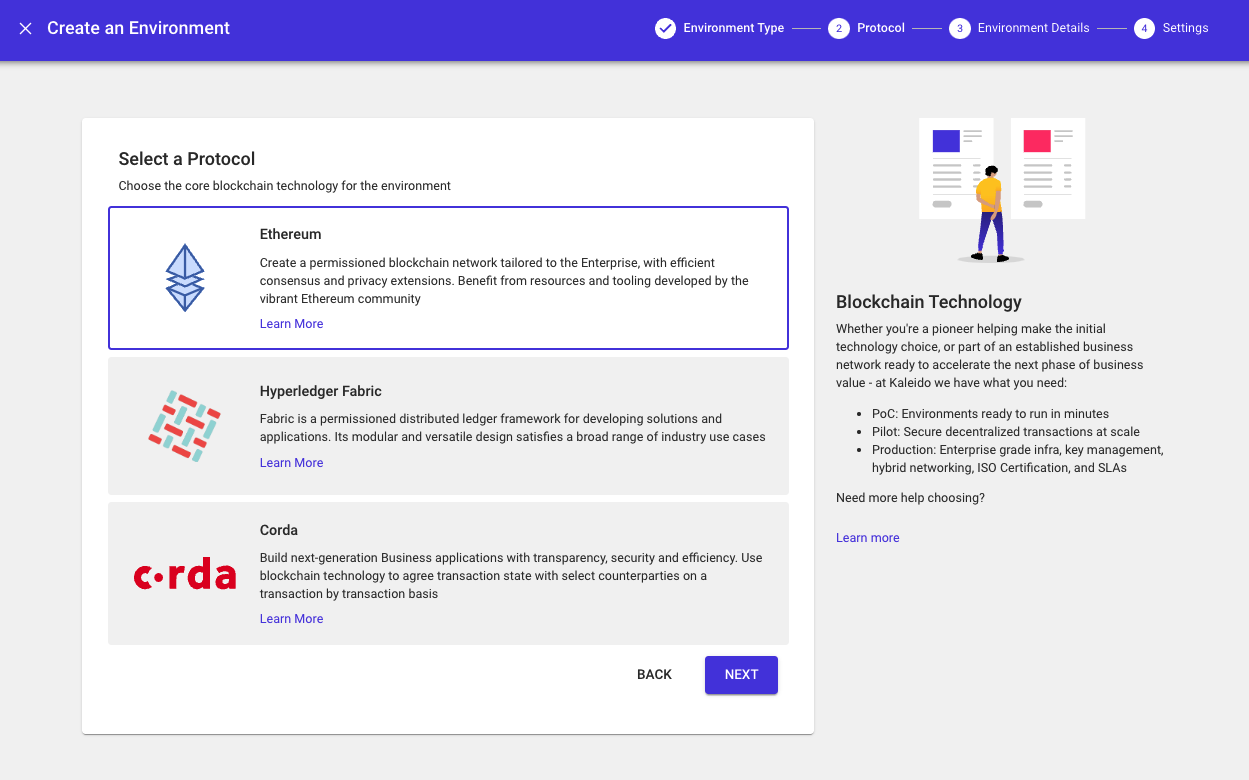
After your network is created you will need to create an environment. There are options for different protocols, however, to mint an NFT make sure you create an “Ethereum” one. You will also need to select a provider.
For our purposes any will do but if you are curious about the differences here is a technical overview.
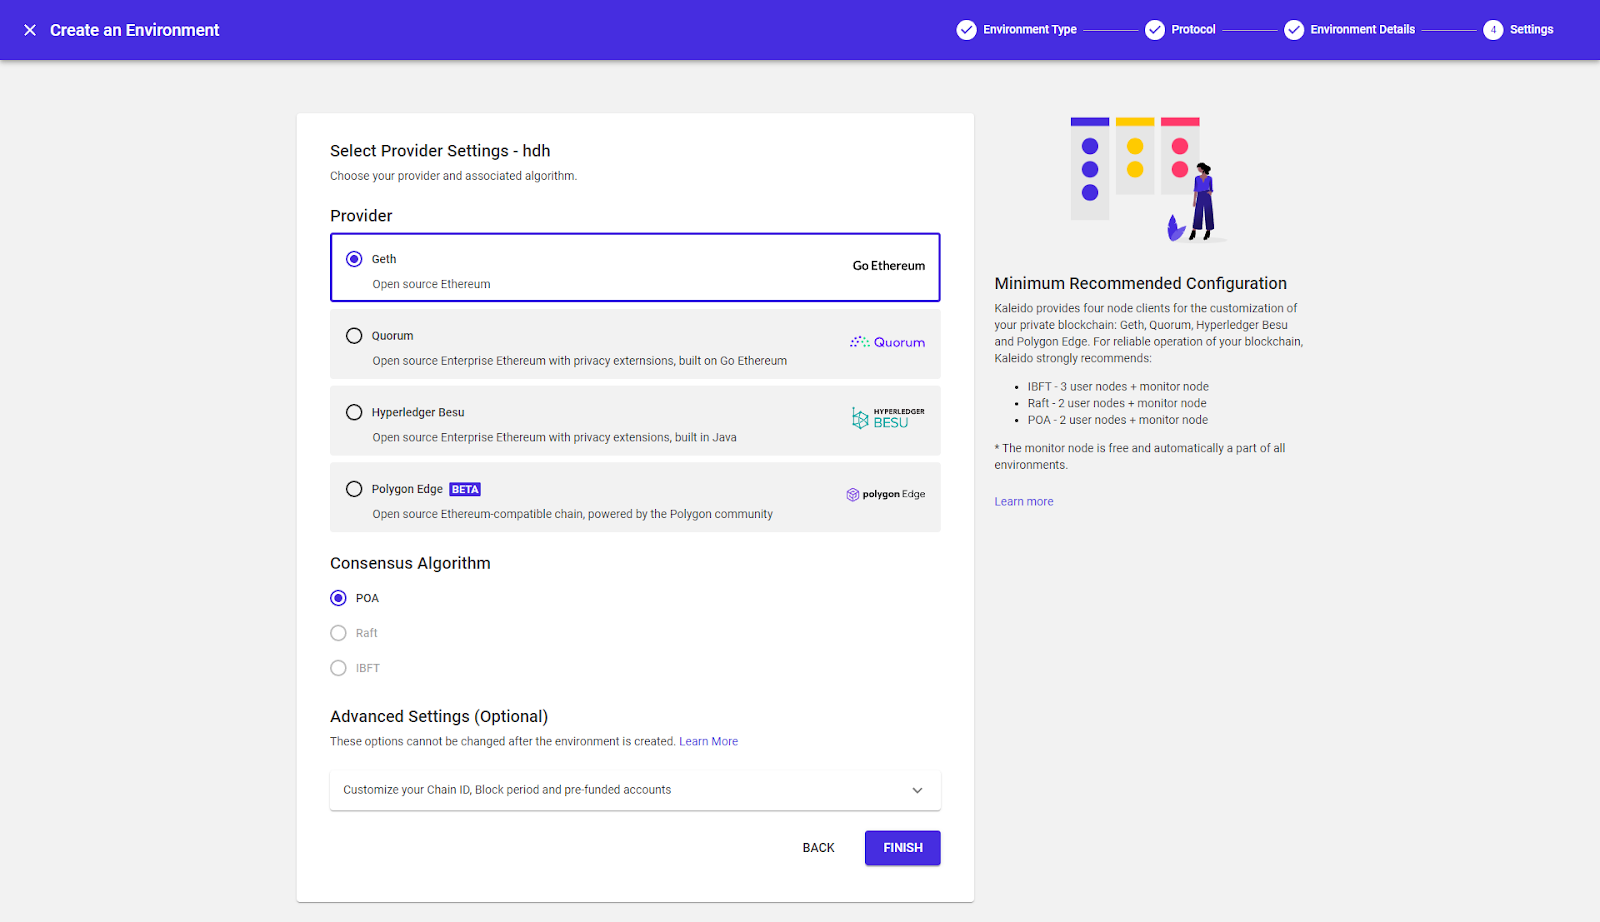
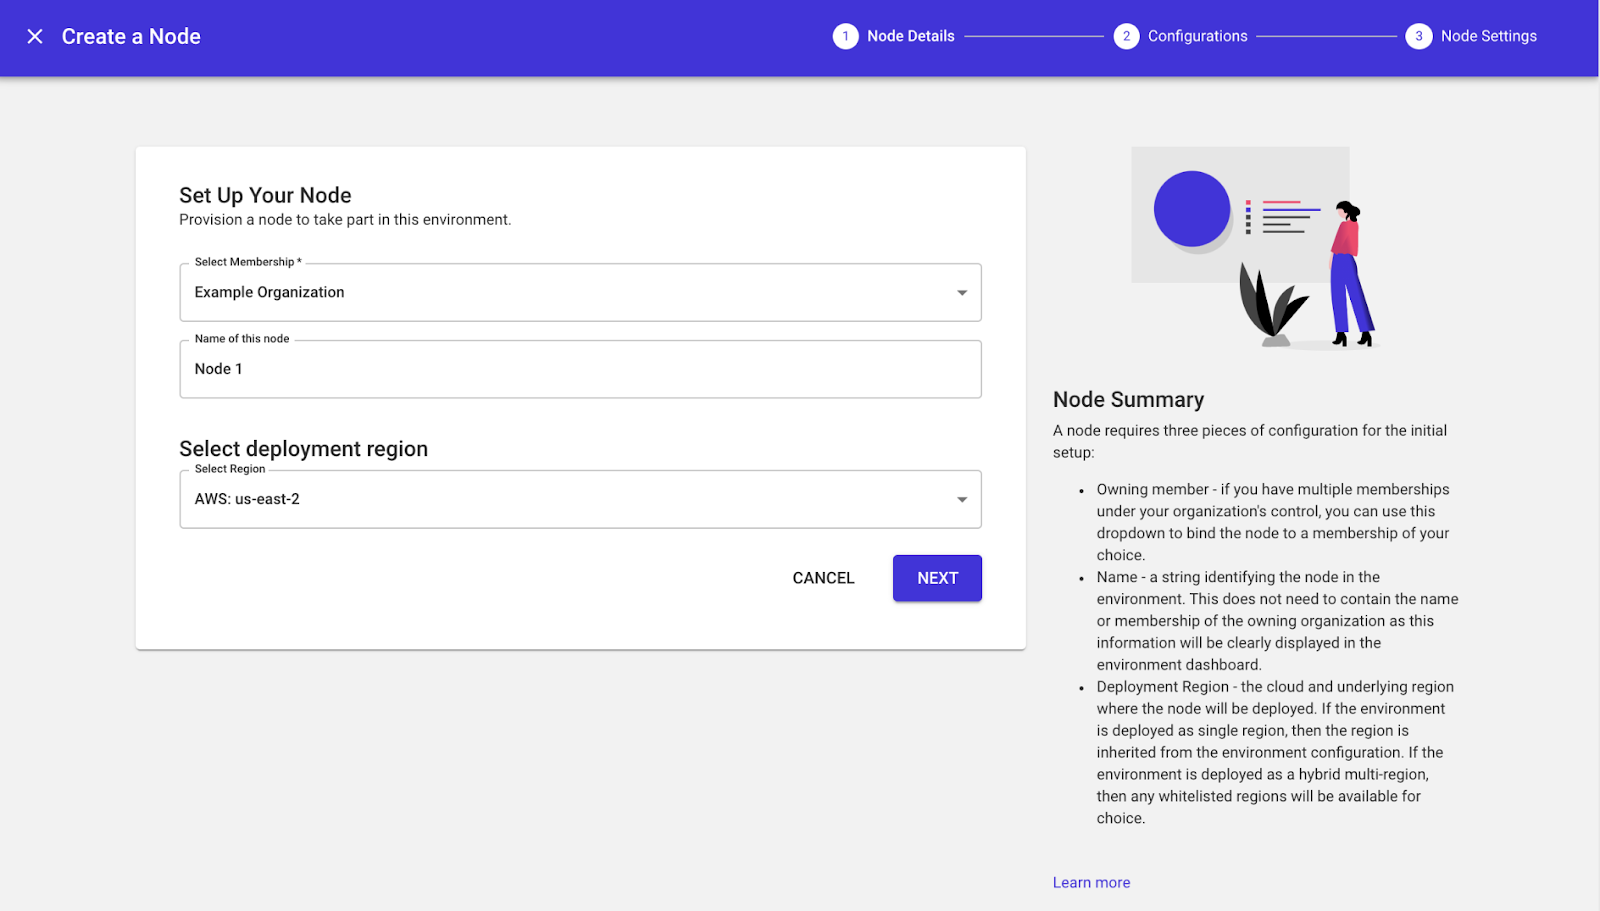
You’re almost there. Once your environment is created, set up a node and leave the default configurations of “small” and “signer” on the final panel.
Now that your blockchain network is created, navigate to the “digital assets” selection in the left panel and click “tokens”. Select the Signing Account as the node you created in the previous step which will be used to deploy the token contract to the blockchain and create using our Token Factory. To mint an NFT, make sure to select either KaleidoERC721Mintable or KaleidoERC721MintableBurnable.
Next, give your token a name and symbol and click “deploy token instance”.

Now that you have deployed a ERC721 contract, the next step is to make your NFT. Go back to the left navigation and click on “tokens”. You should now see your created NFT. In the top right, click “select signing account” and pick the same account you used to create your NFT.
Next click mint, give your token a unique numerical ID, and token URI if applicable.

The token URI is used to point to a unique image for the NFT which contains metadata (example below).
{
"name": "NFTexample",
"description": "Example of a NFT",
"image": "https://example.com/NFTexample.png",
"attributes": [
{
"trait_type": "ease_of_use",
"value": 100
}
]
}
The URI is optional but recommended and more information can be found here.
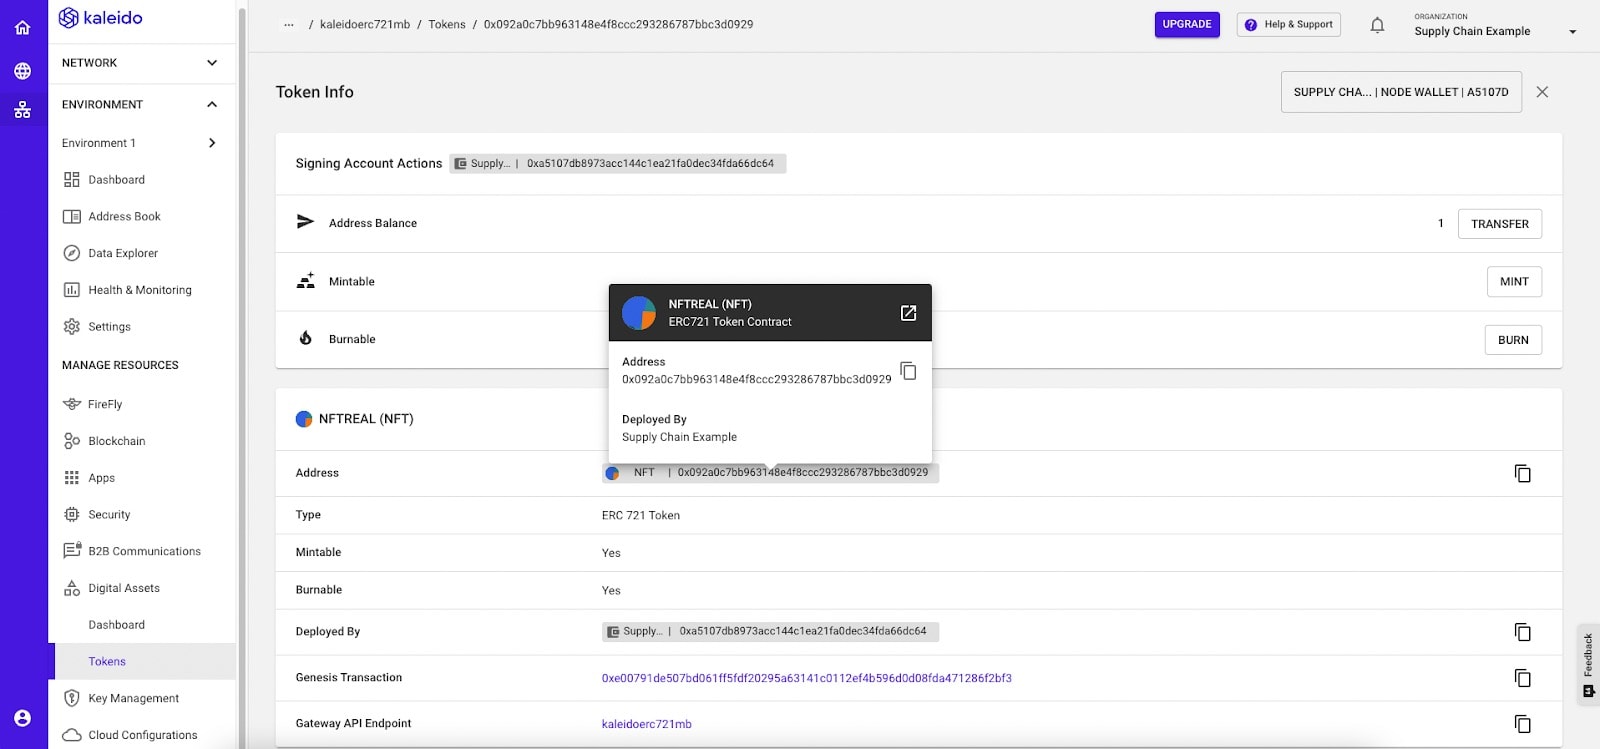
After creating your ERC721 token, click on the Digital Assets tab on the left nav and select Token. From there deploy the contract if you haven’t already. Once the contract is deployed, click into the details to see a screen like below:

Select your signing account and the MINT button should become clickable. Click “Mint” and you will be given prompts to enter the Token ID, URI, and optional target address. For token ID you may assign any numerical digit but keep in mind that each NFT that is created needs to have a unique Token ID. This means the same NFT contract cannot have two NFTs with Token IDs of 1. For this example, we will give the Token ID the value of 1. Click the Mint button and you should see a successful mint pop up.
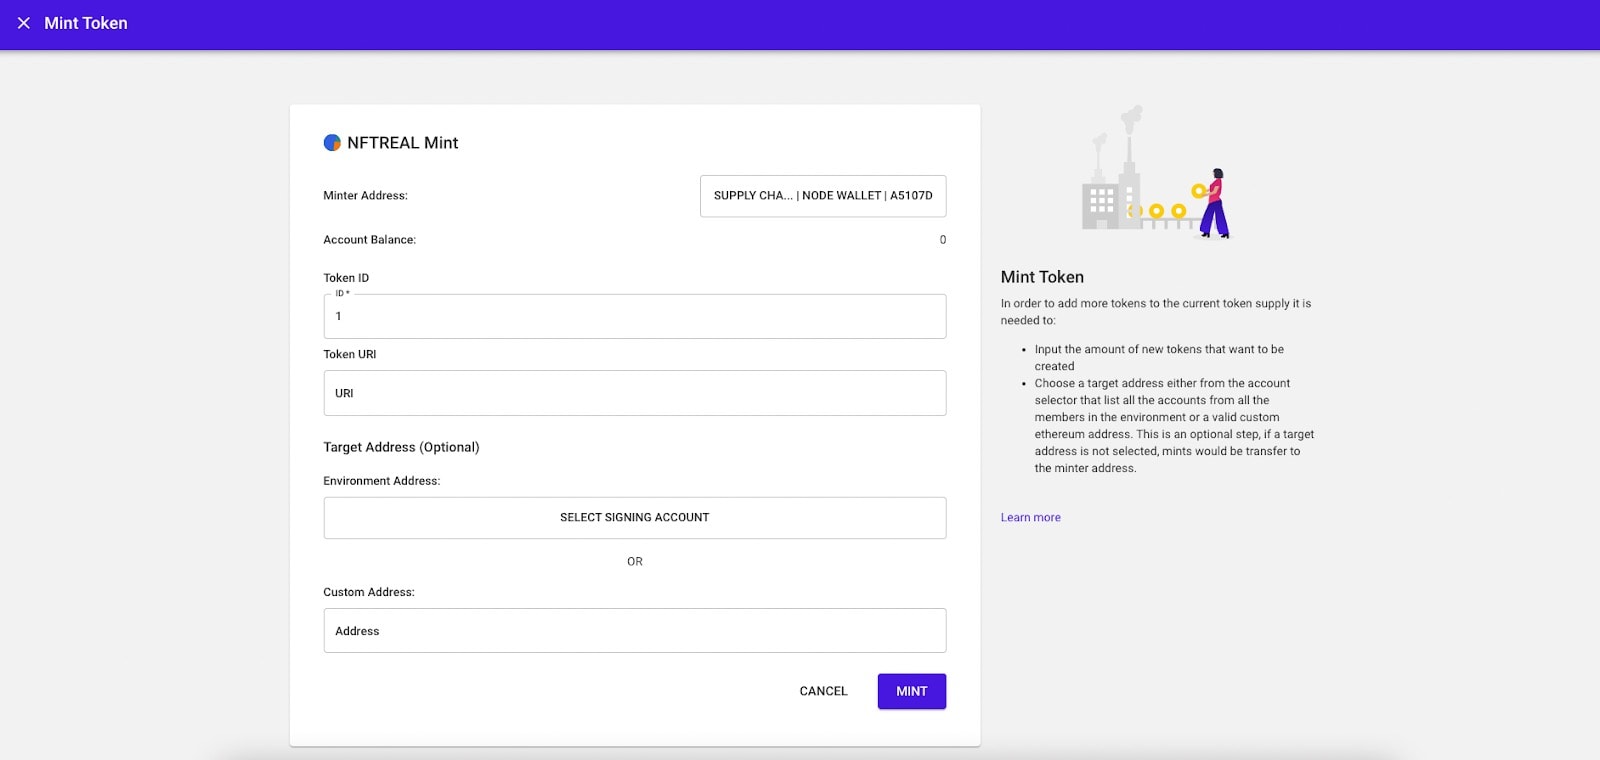

Click the x in the top left and you should see that the Address Button has now updated to 1 with the account address. Congratulations you have now made your first NFT!
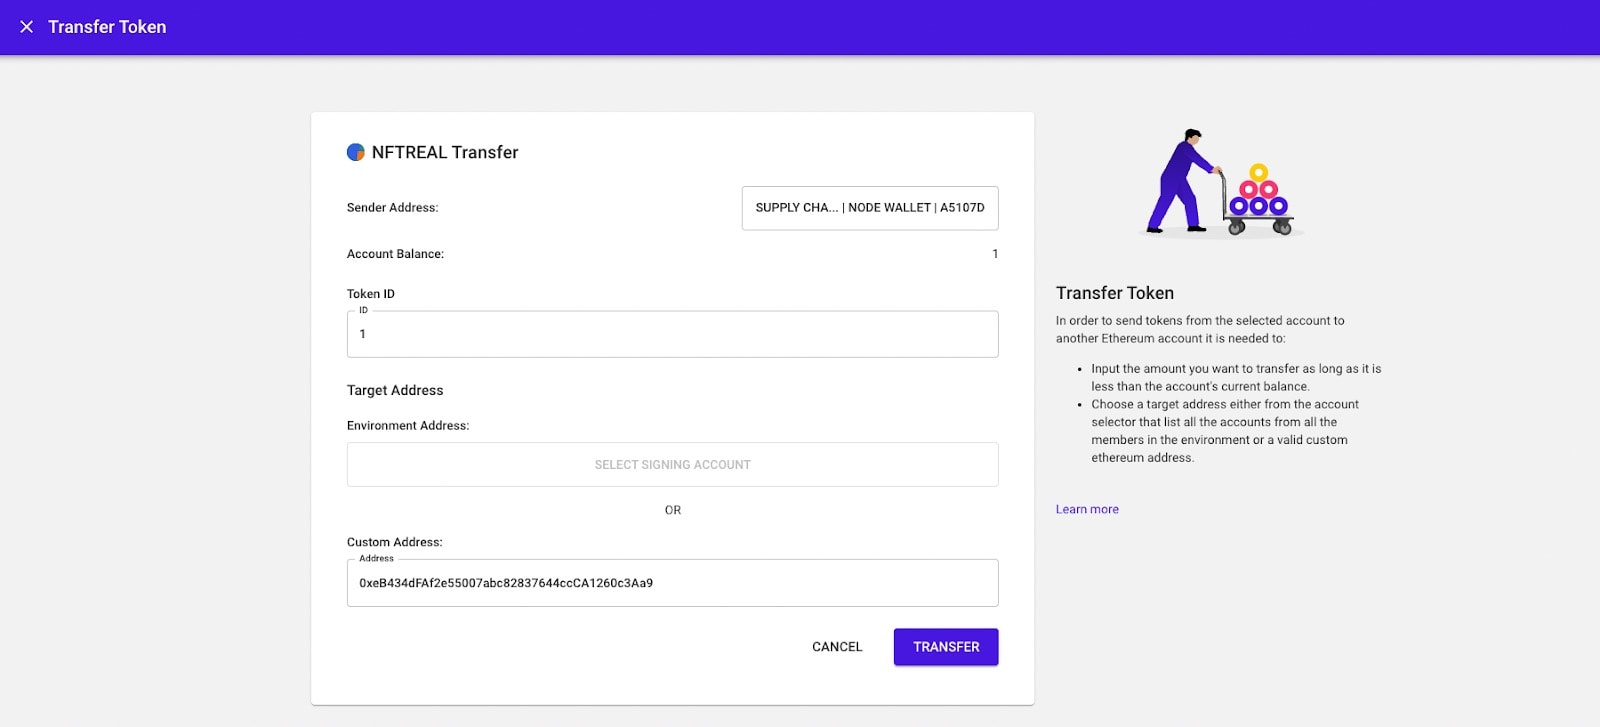
In the same screen click the Transfer button.

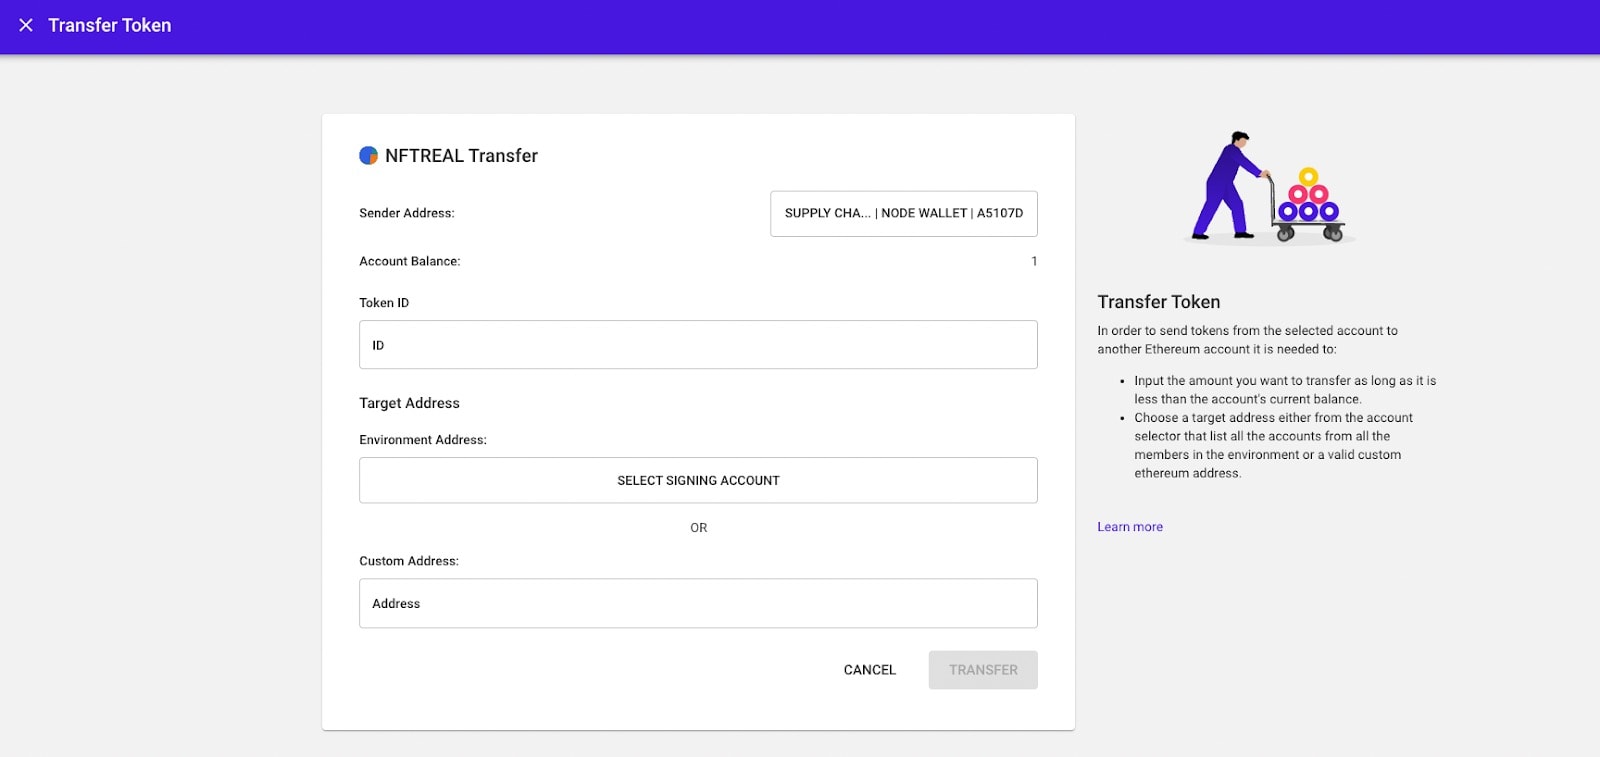
You may either provide an address from your blockchain environment or a custom address. To get another address in your blockchain environment simply create a second node. In this tutorial we will show how to get your token into Metamask.
If you haven’t setup a Metamask wallet before, this guide will help you make one.
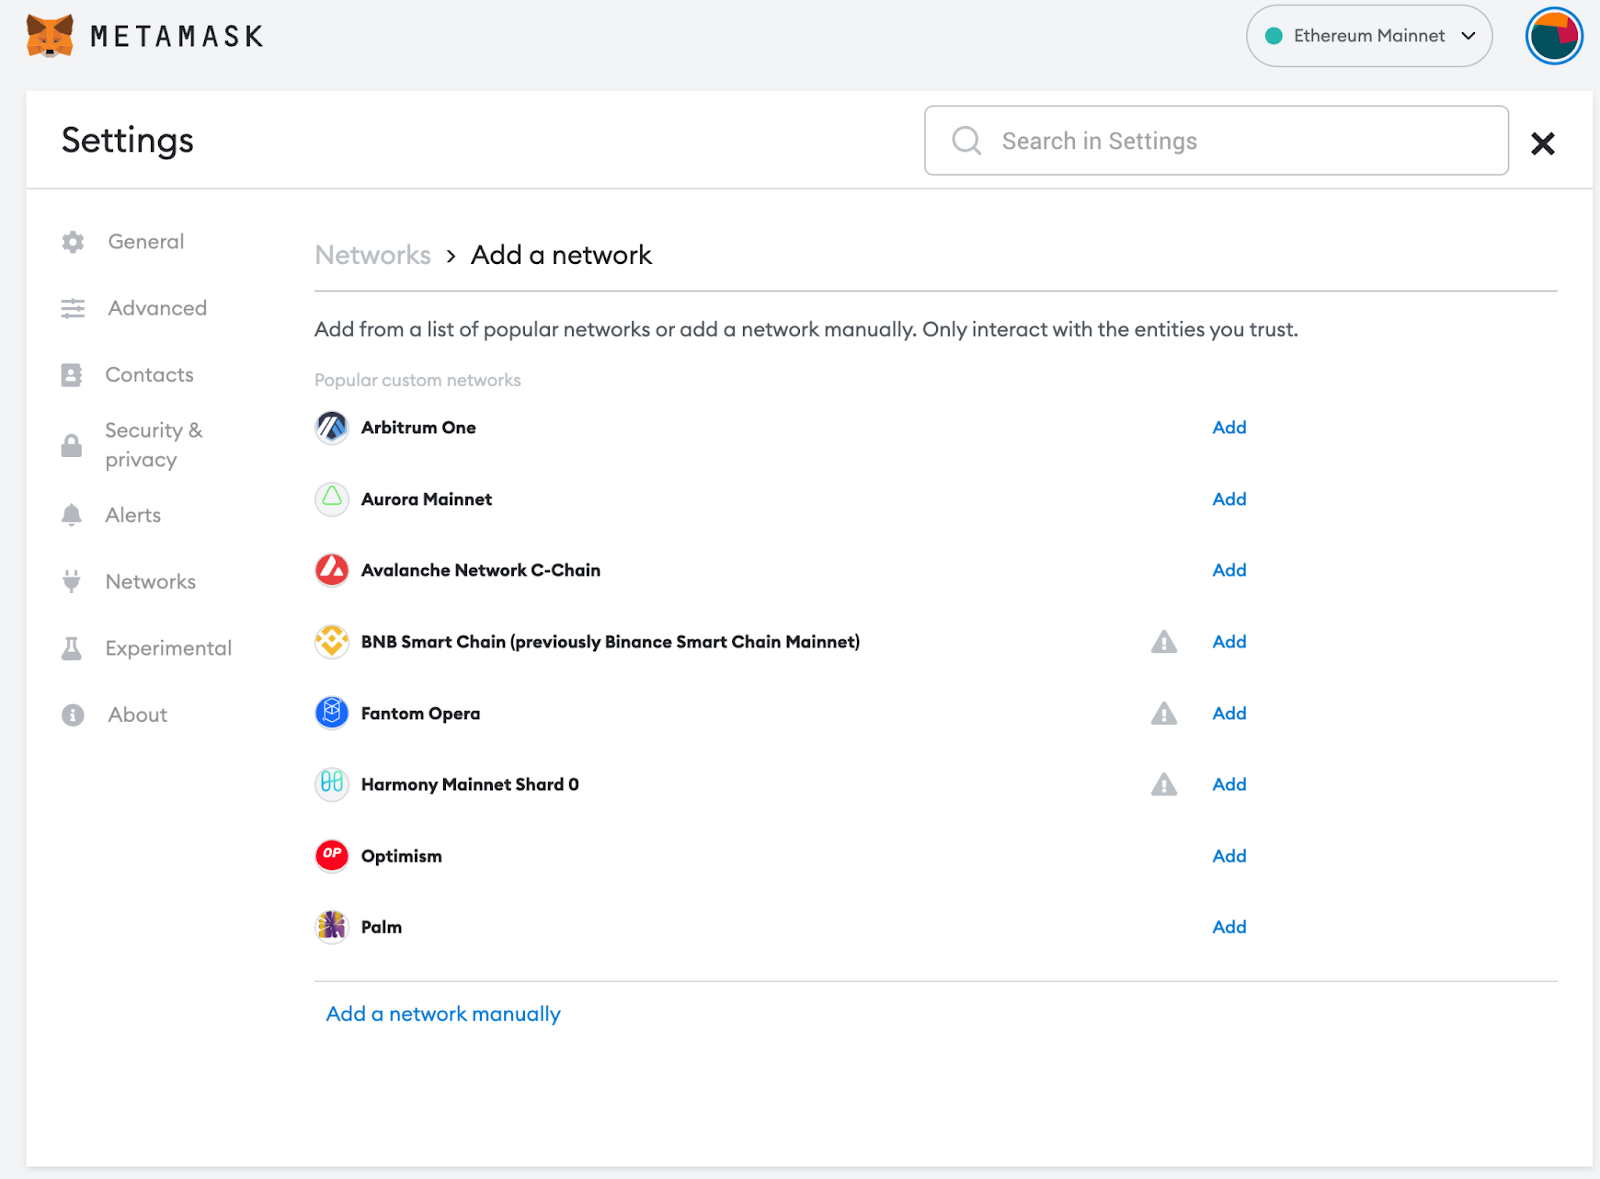
In your Metamask account, click the networks dropdown and click “Add Network.”
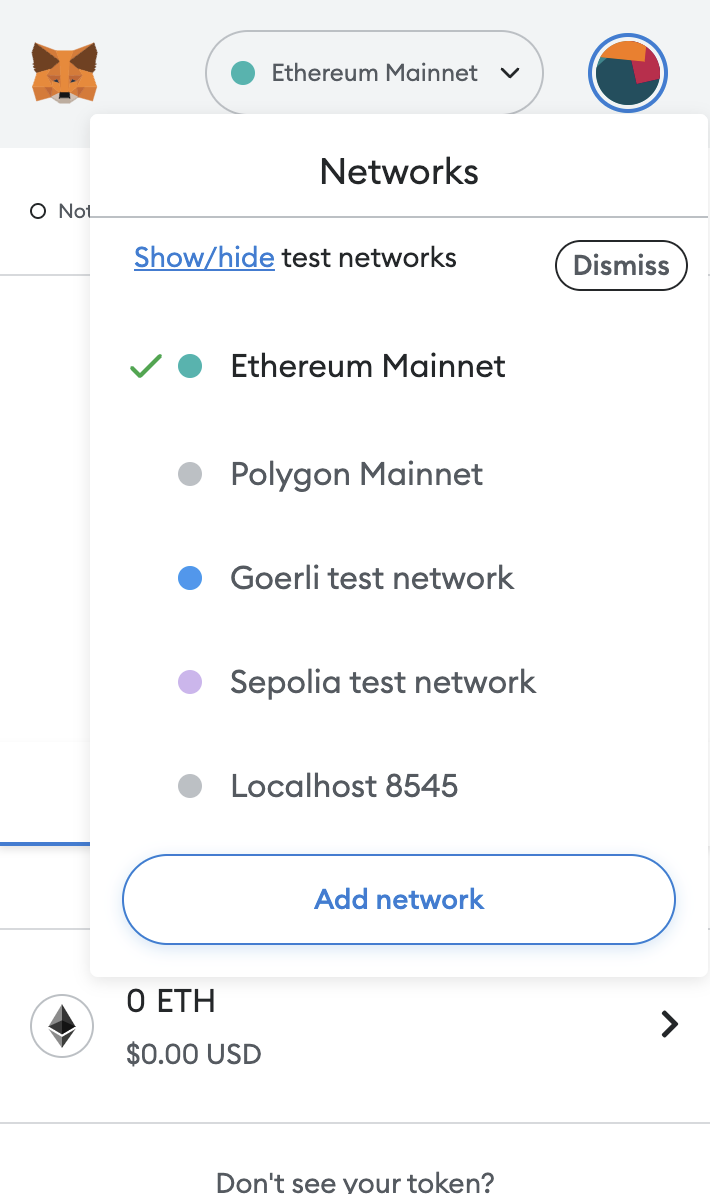
This will bring you to your Metamask settings screen where you will need to “Add a network manually”.
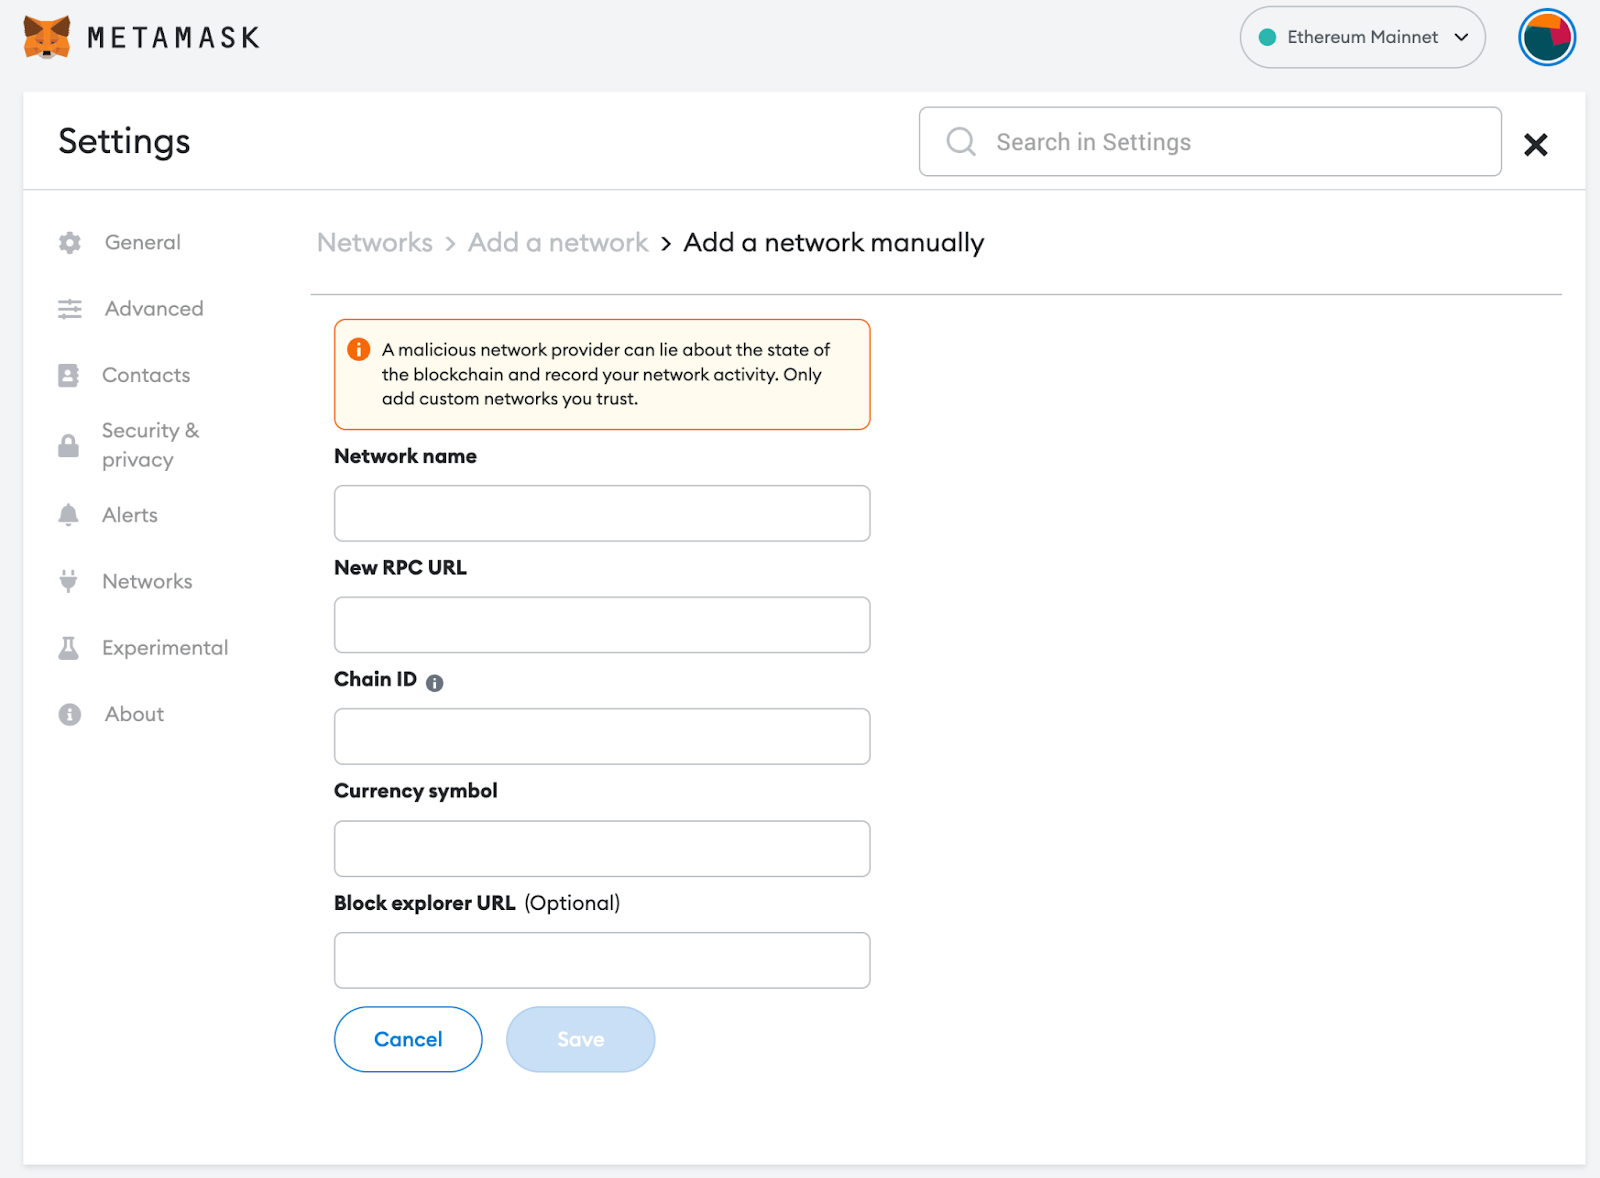
For Network name, you may name this anything. To get the RPC URL and Chain ID, navigate back to your Kaleido console and go to the Blockchain section. On the Blockchain dashboard select “View Node” for your node.
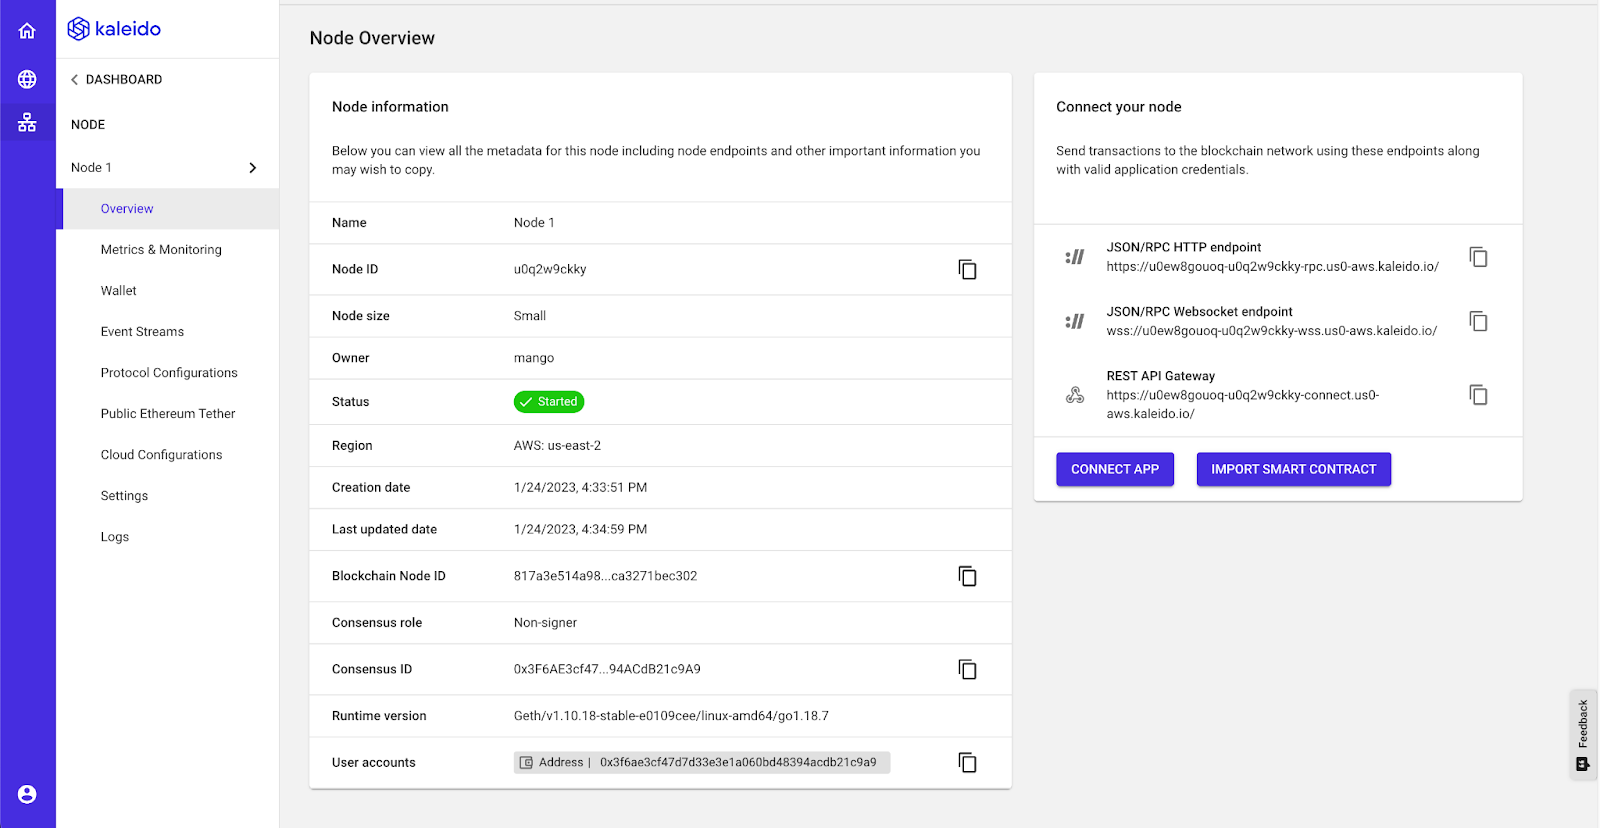
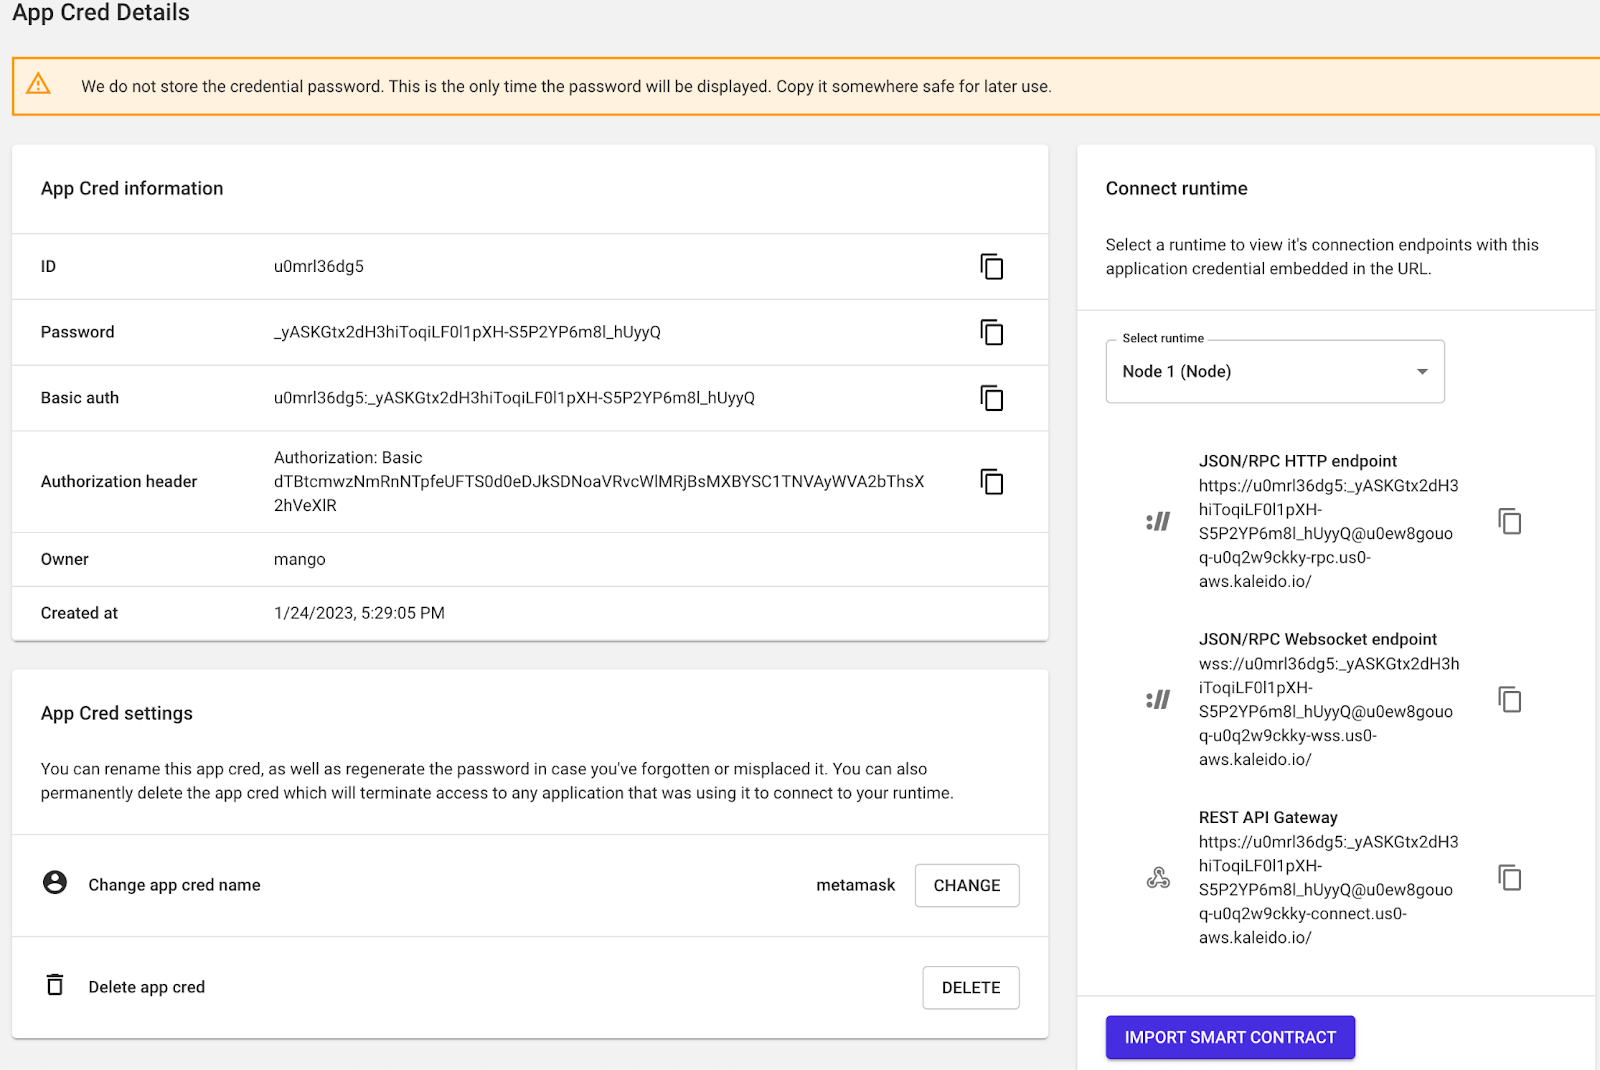
Then click Connect App and create a new app cred called “metamask”. The RPC URL will be listed under JSON/RPC HTTP endpoint. Copy this value into Metamask.
To get your Chain ID, click on the Settings section. Your Chain ID will be under Environment Info.

Once you have all the information click save in the Metamask settings.

Next, click “Import tokens” which should prompt you for the token address. The token address may be found in the Tokens section under Token Info.

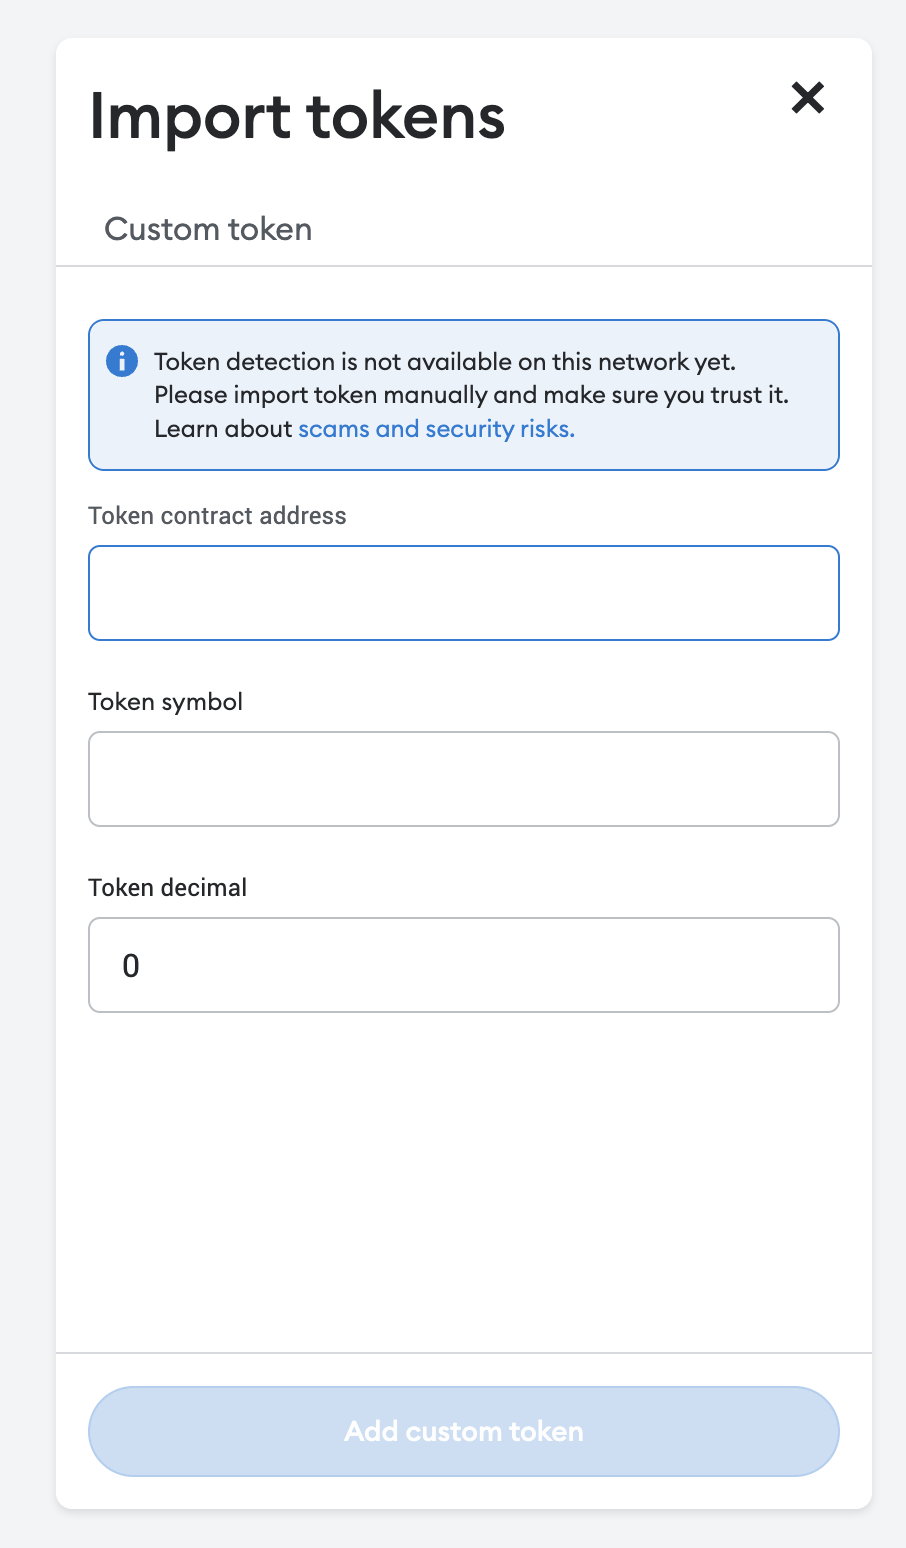
Copy this value and your token symbol and decimals should auto-populate. Finally, transfer tokens to your Metamask account by copying your Metamask wallet address.

Select an amount to transfer which will be 1 and the Token ID will be the value you had entered in the previous step. Then click Transfer. Once you get a “Successful Transaction” message, go back to your Metamask wallet.
Refresh, and your balance should now appear.

NFTs have a wide array of applications across industries, largely driven by their ability to ensure the uniqueness, ownership, and provenance of both digital and physical assets. Digital asset tokenization is also a popular trend in the enterprise space. Where once tokens were synonymous with public chain-based cryptocurrency, today businesses are tokenizing many real world assets to digitize legacy systems.
Tokens are especially helpful when transferring assets on a shared business network because they are well-defined, traceable, and secure. You can essentially create a token, or digital twin, out of any real-world item. This includes holdings, contracts, even property.
Understanding these applications and making them function in a business setting may require knowledge of technology, law, art, finance, and more. But getting started with NFTs has never been easier. Tools like our NFT Platform let you create dedicated experiences that customers will enjoy.
NFTs present an excellent opportunity to build, reward, and monetize an audience. The digital nature eliminates concerns related to physical transportation or storage. Another advantage of NFTs is how simple they are to create, especially when you use a platform like Kaleido’s.
Once your NFT is created, it gains the characteristics of a traditional asset, enabling trade or sale. This enhanced fluidity simplifies the process of turning digital arts and assets into a financial gain.
When it comes to custody solutions for blockchain assets, there's no one-size-fits-all approach. Depending on the type of asset and the level of security required, different custody solutions may be necessary.
By considering the unique features of tokenized assets, such as their underlying physical assets and regulatory requirements, we can develop custody solutions that provide the necessary level of security and compliance.
Kaleido makes all this much, much simpler. With native wallet integrations, click-button connections to third-party custody providers, and the ability to map wallets to users at scale, we’re the partner to help you solve your digital asset custody challenges.
Kaleido simplifies the process of storing NFTs on the InterPlanetary File System (IPFS) through our platform, offering a streamlined approach to integrating blockchain technology with decentralized storage.
Here’s how Kaleido facilitates this process:
Kaleido's approach to integrating storage into your application significantly lowers the barrier to entry for creators and businesses looking to do business with blockchain, offering a robust, secure, and user-friendly platform for the digital asset economy.
Creating an NFT is just one of many things you can do using Kaleido. Be sure to check out Kaleido’s YouTube channel, blog posts, and docs for more information and other tutorials about how to use the platform. To get you started, here's quick overview of how Kaleido makes it easy to launch enterprise-scale NFT Solutions.